Target audience: Administrators
Introduction to Hierarchies
An Eletive hierarchy is a structure used to reflect organizational or people structures. It helps create a clear chain of command and defines access within the platform. By setting up hierarchies, you can support collaboration and accountability while giving managers a clear overview of their teams or departments. This enables more effective delegation and responsibility tracking.
Hierarchies are configured under Settings → Attributes when working with a choice or user type attribute.
An Eletive hierarchy is a structure used to reflect organizational- or people structures. They help create a clear chain of command and access control within the platform. By setting up Eletive hierarchies, you will be able to foster a culture of collaboration and accountability. This enables managers to have a clear view of their respective teams or departments, enabling effective delegation of tasks and tracking of responsibilities.
A hierarchy consists of the following elements:
- Root segment
The top-most segment in the hierarchy, with no parent. - Parent segment
A segment that has one or more child segments directly below it. - Child segment
A segment directly connected below another segment (its parent). A child segment can also act as a parent to other segments. - Leaf segment
A segment with no child segments.
A hierarchy is created by defining relationships between parent and child segments. When a user is given manager access to a parent segment, they automatically gain access to all connected child segments.
Example and use case
Below is an example of how a hierarchy can be structured for a choice-type attribute:
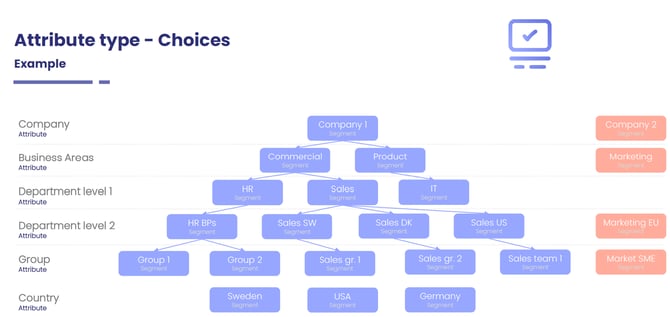
Alex is a manager of the segment Commercial within the attribute Business Areas.
Within this structure, there are three organizational levels:
- Departments level 1
- Departments level 2
- Group
By building hierarchies across each level, based on the organization’s structure, Alex gains manager access to all child segments under Commercial.
Example segments:
- Departments level 1: HR, Sales
- Departments level 2: HR BPs, Sales SW, Sales DK, Sales US
- Group: Group 1, Group 2, Sales gr. 1, Sales gr. 2, Sales team 1
Manage hierarchies and hierarchy settings
Add, edit or remove hierarchies
When creating a hierarchy, the manager of the parent segment automatically gains access to all segments below it.
To add hierarchies:
- Go to Settings in the navigation menu
- Select Attributes
- Choose a choice or user attribute
- Select one of the methods below
Automatic
Automatic hierarchies allow you to create and maintain hierarchies based on how users are structured across attributes. Instead of manually linking segments, the system generates these relationships automatically—either once or continuously.
The system compares users in segments from a selected child attribute with segments in a parent attribute. Based on user overlap, Eletive connects each child segment to the most relevant parent segment and assigns manager access accordingly.
This method is recommended when you want to reduce manual work and keep hierarchies aligned with your actual organizational structure.
Activate automatic hiearchies
To enable automatic hierarchies:
- Open the attribute that will act as the parent
- Go to the Hierarchies tab
- Click Auto hierarchy
- Follow the instructions
- Select a value for Lowest Accepted Match
The Lowest Accepted Match determines how large a percentage of users in a child segment must belong to the same parent segment for a hierarchy to be created.

For example, if the threshold is set to 80%, at least 80% of users in a child segment must match a single parent segment.
- A higher percentage results in stricter, more precise hierarchies
- A lower percentage allows more flexible matching
- Click Add Attribute and select the relevant attribute(s)
- Choose one of the following options:
- Save
Creates hierarchies and keeps them continuously updated as changes occur. Child segments included in automatic hierarchies cannot be edited manually. - Run Once
Creates hierarchies one time only. Afterward, they can be edited or removed manually and will not update automatically.
Mass edit
Mass editing is recommended when creating many hierarchies at once.
To use this method:
- Click the three-dot menu and select Mass edit hierarchies
- Download the template
- Fill in the CSV file:
- Remove all rows that do not contain both parent and child values
- Save the file (do not change the format)
- Upload the completed template

Add new hiearchy manually
To create hierarchies manually:
- Navigate to the Hierarchies tab in the relevant attribute
- Click Add new hierarchy
- Select a parent segment
- Select one or more child segments
- Click Create