When using Kiosk mode, neither phone number nor email is needed. You have the option to use either unique Kiosk codes or Employee IDs for each employee to let them access their surveys. To answer the survey, the employee goes to the "kiosk", i.e. the device such as a tablet or computer, and enter their personal Kiosk code or Employee ID and answer their questions.
To enable the Kiosk feature, proceed by
- Click on Settings in the navigation menu
- Click on the Features tab
- Activate the feature by click on the enable tab so that it turns green

To start using the Kiosk feature, proceed by
- Navigating to Settings -> Users -> Press "Kiosk" in the top right corner and proceed with the Kiosk settings
- Selecting which log in type that you are going to use:

Kiosk code: This options allows for automatically generating unique kiosk codes. These can the be downloaded in excel format and be distributed to the employees in the way you prefer.
Employee ID: This option allows for users having their Employee ID as a code instead of a Kiosk code in order to access the surveys.
Note: If using Employee ID as log in type, the IDs may be accessible to other individuals within the organization, potentially granting access to employee surveys. To protect privacy, use this feature with caution.
An Employee ID can be 20 symbols/characters long at most
If using Kiosk code as log in type, proceed by
- Press on "Download Kiosk codes"

This will generate unique kiosk codes for each user and display them in a csv file that can be opened in Excel. Each Employee Kiosk Code can also be found in each user profile under "Settings -> Users"
To regenerate the Kiosk codes for all users, proceed by
- Click on Settings in the navigation menu
- Click on the Users tab
- Click on the Kiosk tab
- Click on Regenerate Kiosk codes (NOTE: All previous kiosk codes will stop working)
To regenerate the Kiosk code for one user, proceed by
- Click on Settings in the navigation menu
- Click on the Users tab
- Search for the user you want to regenerate the kiosk code for
- Click on the user
- Click on the reload button to generate a new kiosk code for the user

If using Employee ID as log in type, proceed by
- Populating Employee IDs to each user in Eletive. There are several options to achieve this:
- User provisioning (automatically update Employee ID / Kiosk code)
- If provisioning user data through HRIS integration, you can map the Employee ID from your HR-system and sync this data to Eletive.

- If provisioning user data through SCIM 2.0 (e.g. Entra ID and/or Custom integration) you can push the kiosk code through path:
urn:ietf:params:scim:schemas:extension:eletive:2.0:User:kioskCode
- If provisioning user data through HRIS integration, you can map the Employee ID from your HR-system and sync this data to Eletive.
- User provisioning (automatically update Employee ID / Kiosk code)
-
- Mass Edit users and update the "Kisok Code - Employee ID"-column in the csv-file. This way you can update the Employee ID for multiple users in one go. Read more about Mass editing users here: Mass edit users
- Manually update one users Employee ID in their Eletive profile under:
Settings -> Users
Open a user profile
Update the field "Employee ID as Kiosk code"
Press "Save"
Lastly, to set up the Kiosk station, proceed by
- Click on Settings in the navigation menu
- Click on the Users tab
- Click on the Kiosk tab
- Copy the URL and set it up on a device such as a tablet, phone, or computer. Users can also visit the URL on their own devices
Kiosk Account
Note: To eliminate the risk of individual data being compromised, existing kiosk users have to be removed and re-added as new user to Eletive for account creation to be possible. The new user profile will not be linked to the old one in order to protect data integrity.
Please find instructions on how to add/edit/remove users here: https://help.eletive.com/users
Enable Kiosk Account creation
- Click on Settings in the navigation menu
- Click on the Users tab
- Click on the Kiosk tab
- Toggle on Kiosk Account
- Select target group. Here, you have the option to configure whether the entire organization should be able to create a Kiosk Account or if this should be restricted to specific segments
If the whole organization should have Kiosk Account enabled, choose target group "Organization":
If specific segments should have Kiosk Account enabled, choose target group "Segment" and then select the specific segments you would like to target:
Account creation

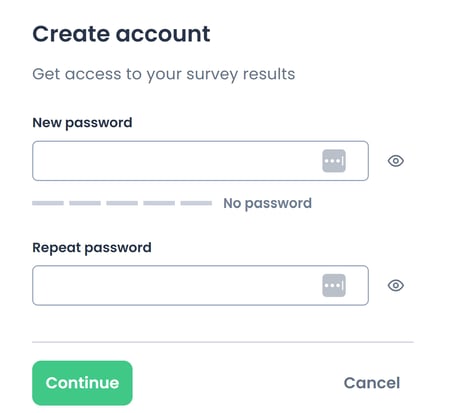
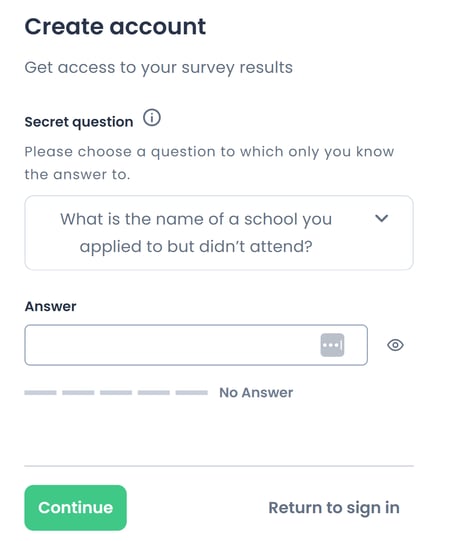
Forgot Password
If the password is forgotten the user can click on "I forgot my password" and will the be asked to answer their secret question.

Note: In case the secret question answer is forgotten, the user needs to be removed and re-added as a new user to Eletive.
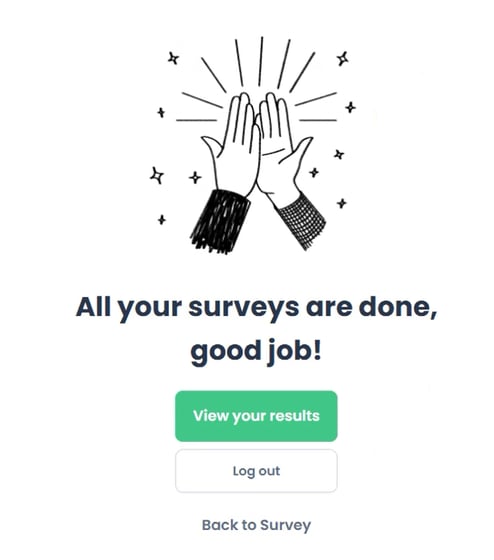
Access the results