Target audience: Administrators
With Eletive you have the possibility to create one or multiple schedules. From the schedule function, survey send-outs can be sent to either a targeted group or the entire organization. Moreover, a schedule can either have a frequency (meaning that the schedule will continuously create survey send-outs automatically based on a time period, e.g. weekly or monthly), or it can be manual (meaning that each survey send-out is scheduled manually).
How you create and configure your schedules will also affect where results are visible in the platform. Therefore, make sure to configure your schedule according to your preferences before enabling it. A common way to use schedules is to:
- Create one schedule for the entire organization, e.g. every quarter.
- Create additional schedules for specific departments, e.g. every week
When it comes to the results, usually, the results from the organization schedule are chosen and configured to be included in the organization report (see step 5 below). The results from the additional schedules are often not included in the organization report.
In the platform, Schedules can be found under Settings/Schedules.
Create a schedule
- Press the "Add Schedule"-button.
Steps 2-6 refer to the General section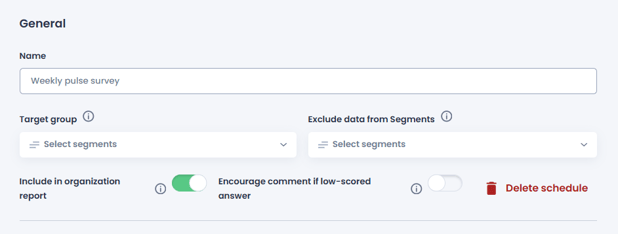
- Name the schedule
- If the schedule should only target specific segments, select them as the Target group
- NOTE: If the entire organization should be targeted, leave empty
- When targeting specific segments, the users in them will receive the survey. These users may also be part of other segments in other attributes, like Tenure segments. This will mean that the Tenure segment reports will also be updated with the generated data. If that is not desired, use "Exclude data from Segments" and select the Tenure segments in this case.
- NOTE: If the entire organization should be targeted, it is recommended to keep this empty
- Decide if the results of the schedule should be included in the organizational report. If yes, activate the parameter "Include in organization report" otherwise make sure it is turned off
- If the Comments feature is activated, a parameter called "Encourage comment if low-scored answer" will also be visible. When turning this one a comment pop-up will show if answering low a question (1 or 2 on the 1-5 scale).
- Steps 7-11 refer to the Survey question and frequency section.
 Select the desired Survey Frequency in the drop-down, and choose between different frequencies or manual (no frequency).
 - Continue by selecting the number of questions per survey.
For pulse survey frequencies we recommend that the two parameters:
"Time to complete full question battery" and Moving average"
match with each other.
This way, the question battery is covered within one aggregation period. If using our default settings and standard question battery, these values will match by default. If not matching, our recommendation is to increase the number of questions per survey. - eNPS question frequency, select the frequency that the eNPS question should be sent out. Note that the eNPS question has to be enabled in step 10 below in order for this option to show.
- Customize questions: If needed, select which questions should be included in the survey schedule. By default, all questions are included.
To add or change the content of the questions themselves, read more here: Questions- NOTE: If questions are turned off during a survey, it will only affect the next survey
- Customize the invite and the survey reminder if desired
- Steps 12-14 refer to the Start Data Collection section
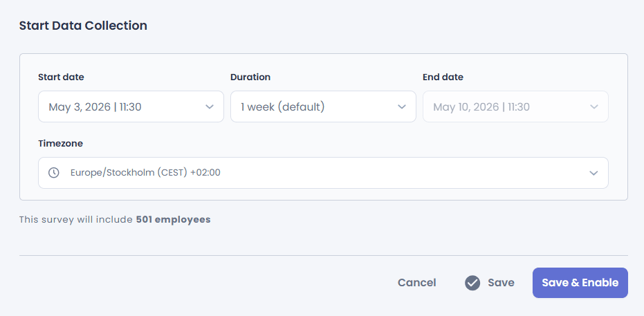
Select start date and duration. The end date will be updated automatically based on the two parameters. - If you want to save the schedule and activate it later, press "Save"
- If you want to save and enable the schedule now, press "Save & Enable"
Note: The default question set is fully customizable. You can edit, add, remove, and reorder questions before sending the survey. Read more here: Questions
Edit or Reuse a schedule
You can either edit an existing survey schedule or reuse it to create a new survey.
To reuse a schedule:
- Open a survey schedule that is not currently active.
- Update the settings needed for the new survey, such as:
- Survey name
- Target group
- Start date and duration
- Survey frequency (if applicable)
- Invite and reminder messages
- Any other schedule settings
- Press Save to save the schedule and activate it later, or select Save & Enable if you're ready to enable the schedule now.
Reusing an existing schedule allows you to keep the existing survey structure, including questions, translations, and other survey configurations, without creating a new schedule from scratch.
Note: By default, an organization schedule already exists, which can be used instead of creating a new one.
Timestamps are saved in UTC (+0000), which does not consider daylight saving time (DST). When configuring schedules before DST, schedules may start and end 1 h later/earlier.
SURVEY SENDOUT:
The survey logic is based on the initial start date and the weekday of that date.
Example: for a monthly frequency of Friday 5th. All future send-outs are planned for the Friday that occurs on or after the 5th of each month.
The initial start date does not necessarily have to be the same as the current /next start date.
If you update the start date in the schedule, that start date and weekday are used for scheduling future send-outs.
For Quarterly frequency, plattform counts 89 days and survey will be sent out next same weekday after 89 days.