Target audience: Administrators, Superusers and Developers
Before you begin
Make sure the following has been made or are in place:
-
You have reviewed the supported HRIS list for your specific system. Some connectors have limitations on custom fields or manager data.
-
You have the Administrator or Superuser role in Eletive
- You have login credentials or authorization access for your HRIS
- If you have existing users in Eletive, read the Testing section carefully before enabling the integration — this step is critical to avoid duplicate user errors, and unwanted deletion of users.
Questions? Contact support@eletive.com or speak to your Eletive representative.
Configuration steps
- Enable the HRIS Integration feature
- Connect your HRIS
- Configure the integration
- Test before going live
- Enable the integration
- Notifications
Step 1 — Enable the HRIS Integration feature
- Go to Settings > Features
- Find the Integrations category and enable HRIS Integration
⚠ Important - This feature requires a sub-processor to handle Personal Data.
You will be asked to accept this before continuing. Check the box and press Accept.
Step 2 — Connect your HRIS
- Go to Settings > Integrations in the sidebar
- Click Connect with HRIS in the top right corner
- Select your HR system from the list
- Follow the authorisation steps for your HRIS and click Save
ℹ Note - The authorization process varies by HRIS system. Some require OAuth, others use API keys or direct credentials. Follow the on-screen prompts for your specific HRIS.
Step 3 — Configure the integration
Work through each section below when setting up for the first time, or when editing an existing integration.
3.1 Lifecycle management
Accessible at the top of the page.
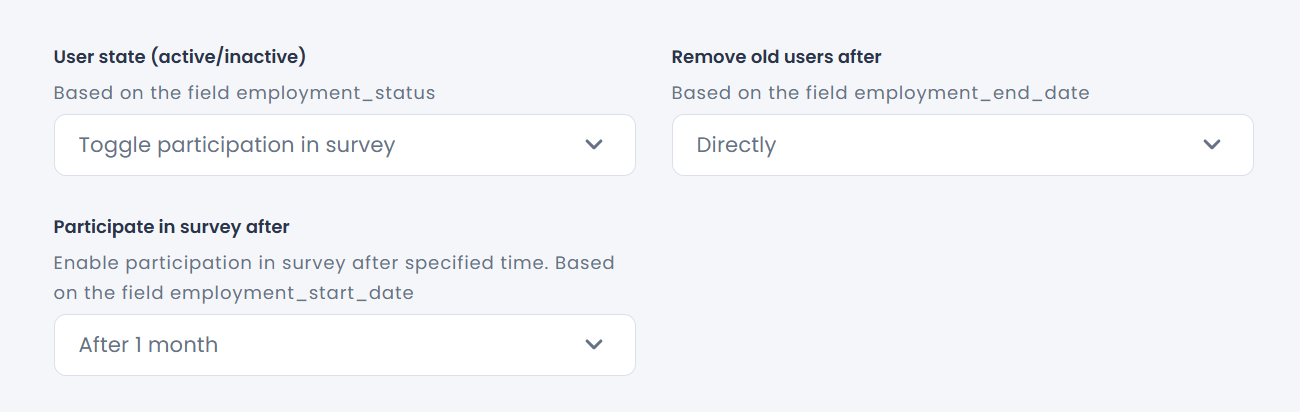 User state (active/inactive)
This setting controls what happens to users in Eletive when their employment_status changes in the HRIS. Use the table below to choose the right option for your organisation:
|
If you want to... |
Select this option |
What happens |
|
Automatically disable survey participation for inactive employees |
Toggle participation |
Active employees: participation on. Not active active employees: participation off. Note: manual changes will be overwritten by the integration. |
|
Automatically delete users when they leave |
Delete |
Active employees: no change. Not active employees: deleted from Eletive. |
|
Manage survey participation manually |
Do nothing |
The integration will not change participation status. Manual changes are preserved. |
Participation start date
If your HRIS provides an employment_start_date field, you can control when new users start receiving surveys:
- Directly — users can participate as soon as they are added to Eletive
- After X months — users start participating X months after their employment start date
User removal
If your HRIS provides an employment_end_date field, you can control when users are removed from Eletive:
- Directly — users are deleted as soon as their end date passes
- After X months — users are deleted X months after their end date
- Never — users are never automatically deleted
The remaining sections (Attribute mapping, Filters, Advanced settings) are available as separate tabs.
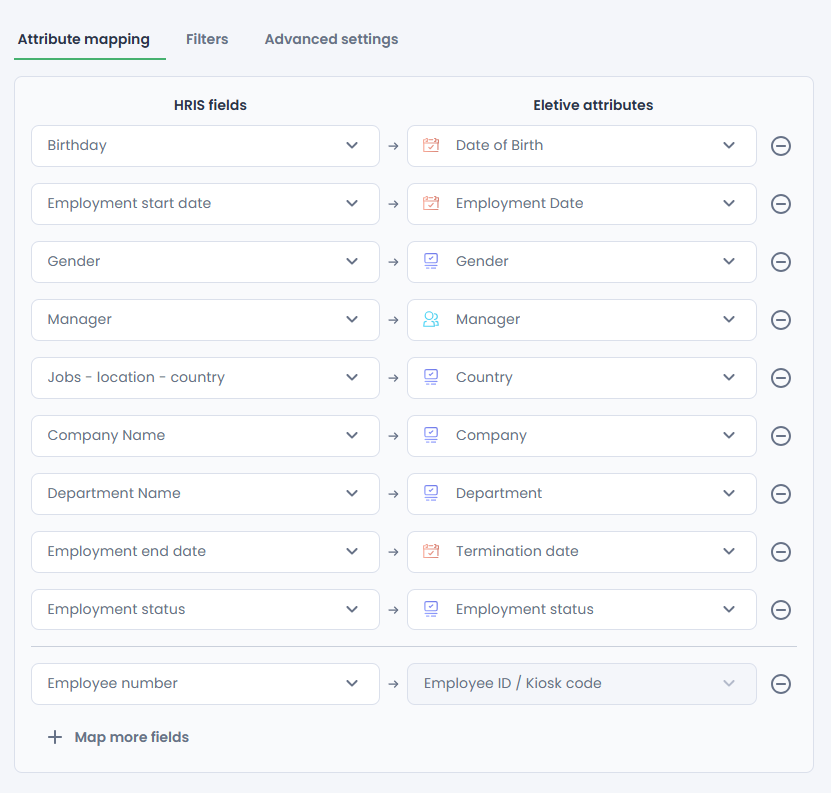
3.2 Attribute mapping
Map each HRIS field to the corresponding Eletive attribute. Unmapped fields will not be synced.
The following standard fields are always synced automatically in the background — you do not need to/cannot map these:
|
Eletive Field |
HRIS API Field |
|
First Name |
first_name |
|
Last Name |
last_name |
|
|
email (primary by default) |
|
External ID |
id |
|
Language |
preferred_language |
ℹ Note - Email type priority: Primary > Work > Secondary > Personal > Other.
You can disable syncing of personal email addresses using the 'Synchronize personal email addresses' toggle.
If preferred_language is not available in your HRIS, users will default to English. Language can be updated manually in Eletive.
If you have not yet set up your Eletive attributes, see the guide on creating and editing attributes before continuing.
Segments within attributes do not need to be created in advance — they will be created automatically during the first sync.
Kiosk code mapping
To map the Employee ID / Kiosk code field, the Kiosk login type must first be set to Employee ID (see the Kiosk guide). You can then map either Id or Employee Number to this field.
3.3 Filters

Filters let you narrow which HRIS users are included or excluded from the sync.
To add a filter:
- Choose an HRIS field to filter on
- Select Include or Exclude
- Enter the field values the filter should apply to (press + after each value; you can add multiple)
- To add more filters, click + Add filter and repeat
ℹ Note - Filter values are case-insensitive — 'Finance' and 'finance' are treated the same.
When filtering on a date-type field, only one filter condition can be added.
Existing Eletive users who match an Exclude filter will be deleted during sync.
3.4 Advanced settings

- Enable / Disable Synchronize personal email addresses
If wanted, you can disable syncing of personal email addresses. The email type priority still applies, turning off this setting simply excludes the personal email type. - Chose user ID as reference for custom fields
Custom fields are by default picked from a random resource, enable this setting to explicitly select a particular user as reference for fetching custom fields.
It's common API behavior that nulled fields are omitted from the response, resulting in less custom fields.
Enter the user ID and press save. This reloads the form and fetches custom fields based on this resource. Validate by checking the list the drop down of HRIS fields.
Step 4 — Test before going live
Running a test (dry run) is strongly recommended — especially if you already have existing users in Eletive. The test shows exactly which users would be created, updated, or deleted, without making any changes.
⚠ Important - If you have existing users in Eletive, you must complete the test and upload the Updated CSV before enabling the integration.
Skipping this step will prevent the integration from correctly matching existing users, and cause error notifications due to duplicate conflicts
Running a test
- Click Test Integration in the top right corner
- Click Run test to start. The configuration view will show 'Test is running'.
When complete, a notification is sent to users with integration access.
You can run up to 3 tests per 24-hour period.
Reviewing test results
Open the notification and click the link to view results. Three CSV files are available for download — one for each category:
- Created — users in the HRIS who do not yet exist in Eletive (matched by External ID or email)
- Updated — users in the HRIS who already exist in Eletive (matched by External ID or email)
- Deleted — existing Eletive users with a prefixed External ID who were not found in the sync (due to lifecycle settings, filters or absence from HRIS)
ℹ Note - CSV files are only downloaded for categories that contain users. Browsers may also block/ask for permission to download multiple files at once.
What to do with each file
Created
Review the list. If you upload this file via User Mass Edit before running the sync, these users will be added to Eletive immediately. If you skip this step, they will be created when the integration runs.
Updated — action required for existing users
Upload this file via User Mass Edit. This populates the External ID field for existing Eletive users, linking them to their HRIS profiles. Without this step, the integration cannot match and manage your existing users.
Deleted
Review carefully. Any user in this list will be deleted when the integration runs. Make sure no unexpected users appear here before proceeding.
ℹ Note - Users without a prefixed External ID in Eletive will not be managed by the integration.
You can configure Segment aliases to ensure existing segment names in Eletive are recognised, rather than creating new duplicate segments.
The Users type attribute (e.g. Managers) will not appear in the CSV until users have been created or their External ID has been populated.
Step 5 — Enable the integration
Once you have reviewed the test results and uploaded the Updated CSV for any existing users:
- Return to Settings > Integrations
- Click on the HRIS to open the configuration page
- Click Enable to activate the integration
Users will sync automatically every 24 hours. You can also trigger a manual sync at any time — note that manual syncs are limited to once per 24-hour period.
If you update the configuration after the integration is already enabled, click Save — you do not need to re-enable it.
Step 6 — Notifications
Administrators and Superusers receive the following notifications tied to the HRIS syncs. Notification preferences can be controlled globally and/or by each individual user.